MCP Security Best Practices
The Model Context Protocol (MCP) creates a bridge between Large Language Models (LLMs) and external tools, data, and functionality. When you leverage MCP, you're essentially allowing AI systems to reach out into your digital ecosystem—accessing files, making API calls, or interacting with databases. The security of these connections directly impacts the security of your entire application.
The MCP architecture consists of three key components working together. The Host runs the AI application. The Client functions as the communication layer within the host application. The Server provides tools and resources for the AI to utilize. Each connection point introduces potential vulnerabilities that need addressing.
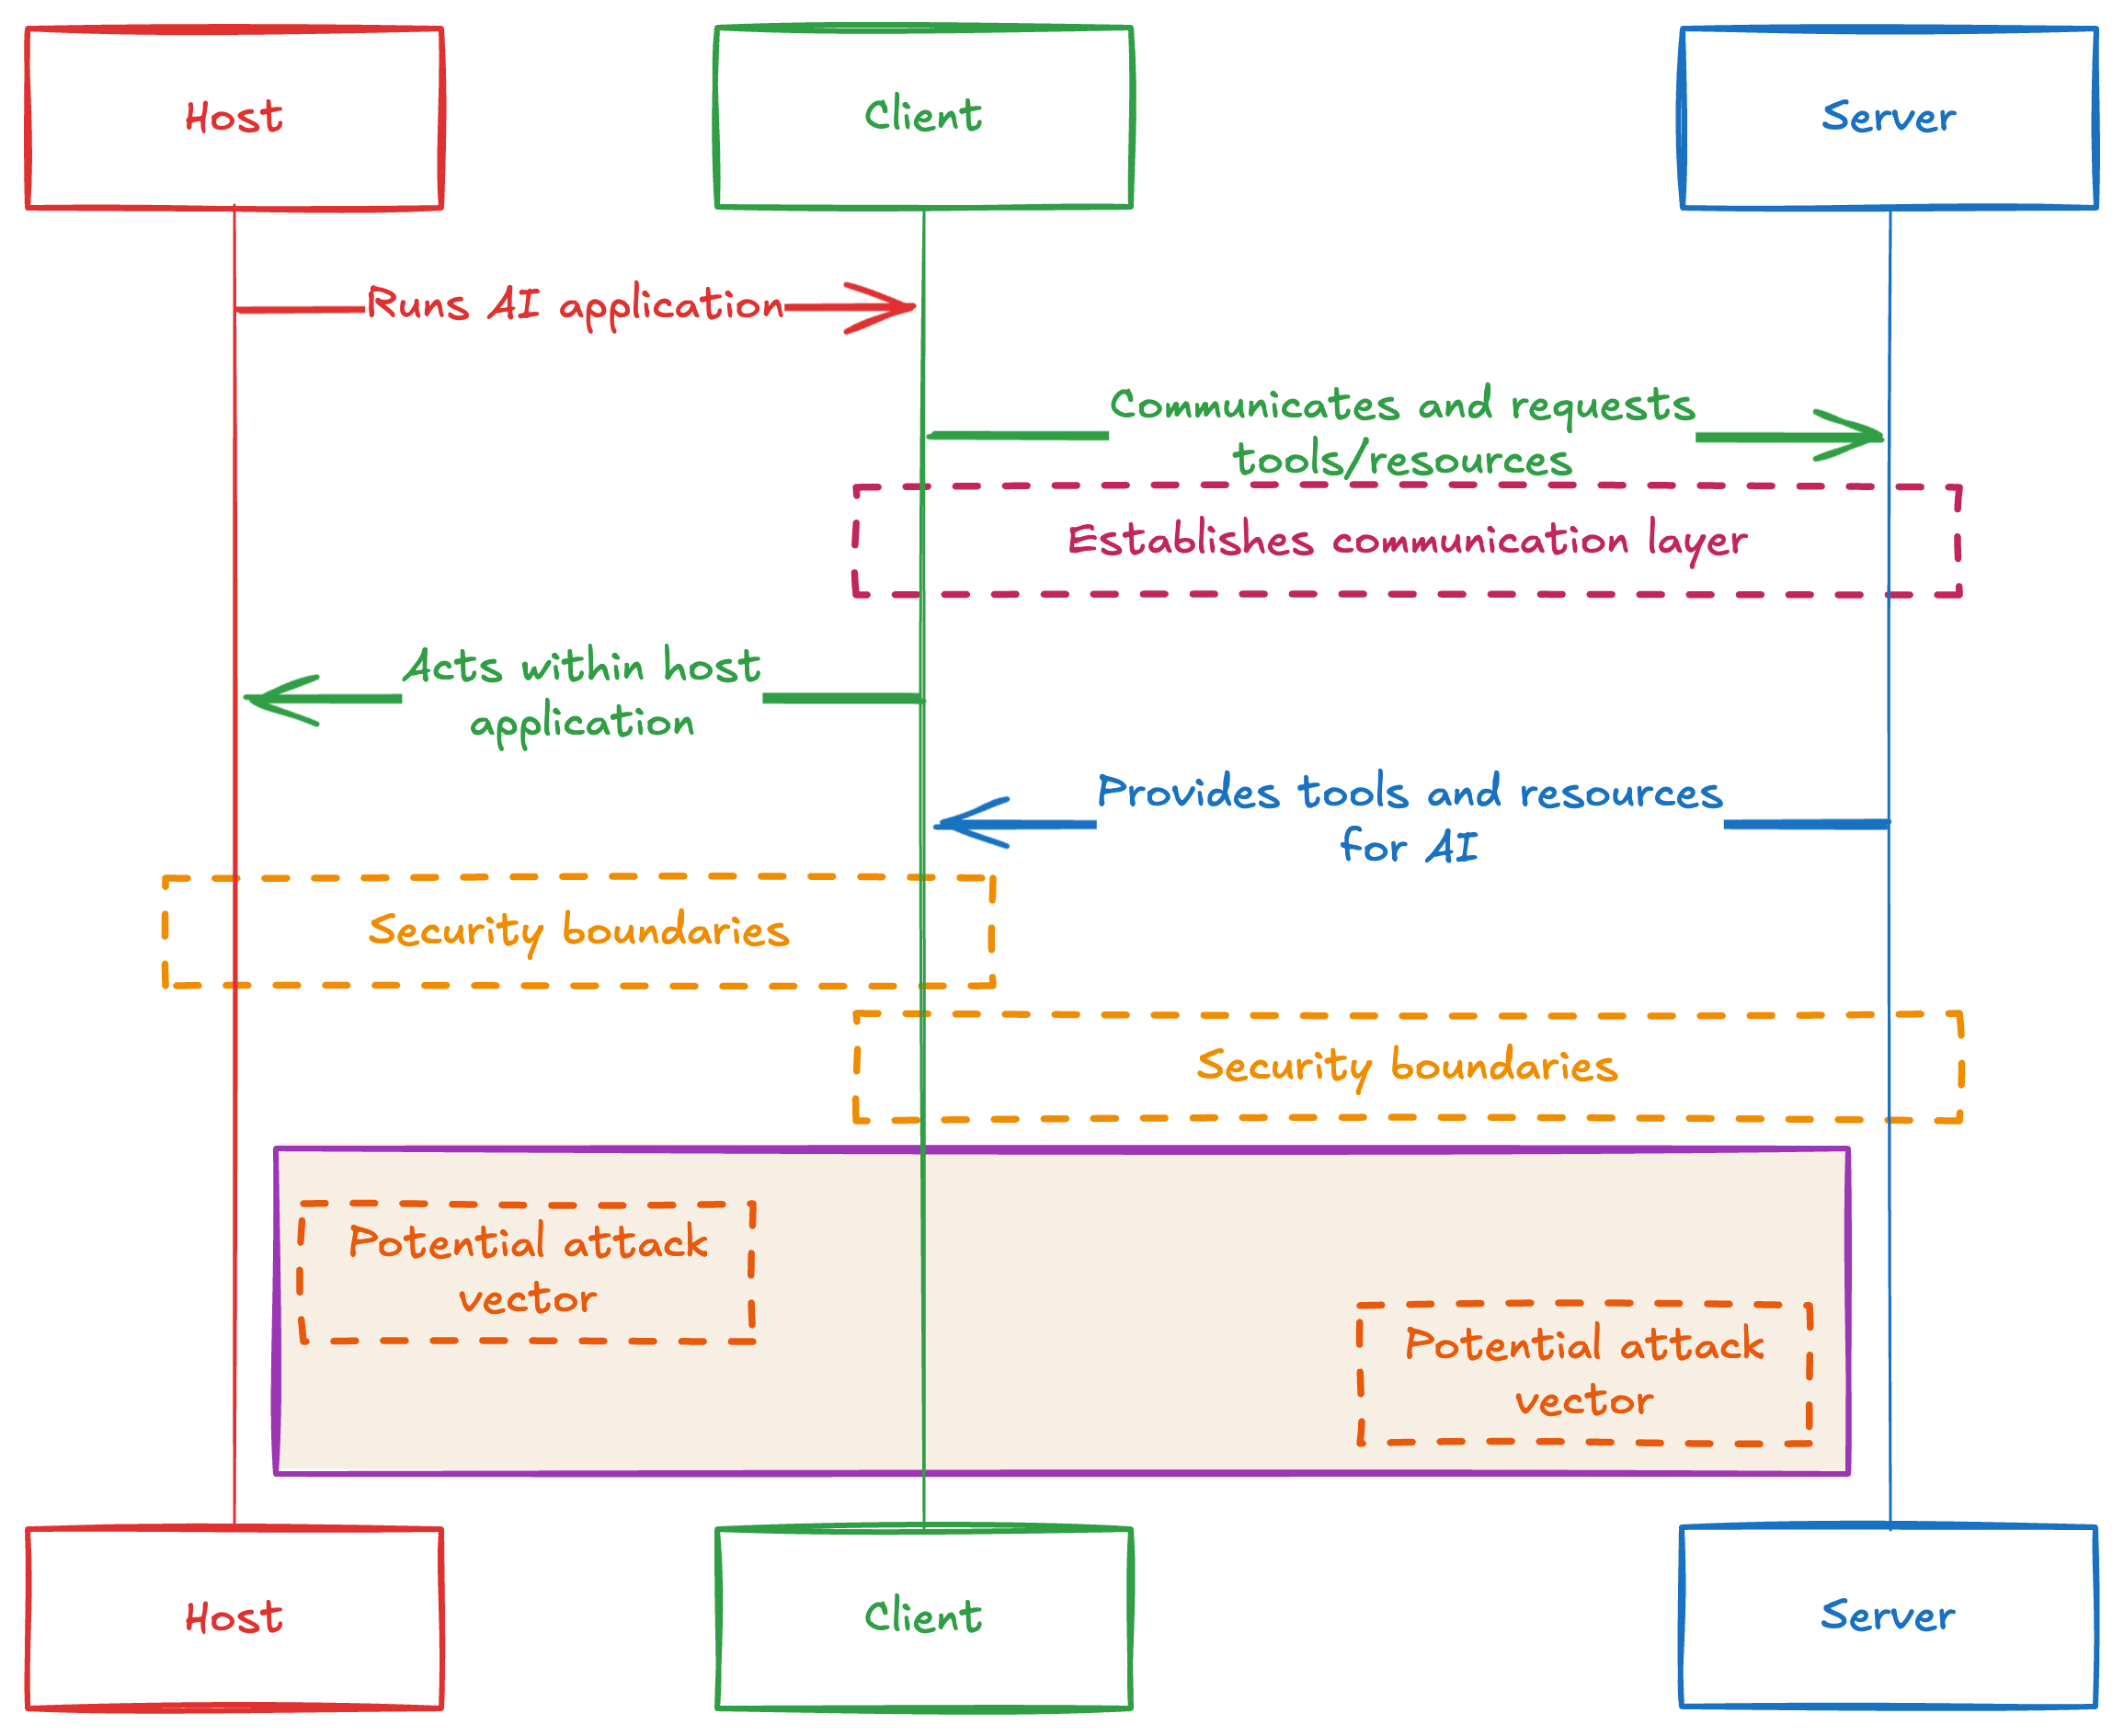 MCP Architecture showing Host, Client, and Server components with security boundaries and potential attack vectors
Security matters tremendously in this context because MCP servers often access sensitive data or critical systems. A compromised MCP connection might expose user credentials, leak data, or allow attackers to manipulate AI behavior. The flexible nature of MCP—which makes it powerful—also creates substantial points of vulnerability that requires careful protection.
Core MCP Security Challenges
The security landscape for MCP implementations contains several unique challenges compared to traditional application security. Prompt injection attacks represent one of the most common threats, where attackers craft inputs designed to manipulate the AI into performing unauthorized actions through available tools. For example, an attacker might embed hidden instructions that trick the AI into accessing files outside of permitted directories.
Tool poisoning presents another significant risk. MCP tools include descriptions that help the AI understand how to use them. Malicious actors can embed harmful instructions within these descriptions, potentially causing the AI to leak data or perform unwanted actions.
Here’s a quick summary of the main attacks MCP servers are susceptible to:
| Attack Type | Description | Risk Impact | Mitigation |
|---|---|---|---|
| Prompt Injection | Inputs that manipulate AI behavior | Data access, unauthorized actions | Input validation, sandboxing, human review |
| Tool Poisoning | Malicious instructions in tool descriptions | Credential leak, data exfiltration | Tool source verification, description scanning |
| Path Traversal | Access to files outside allowed directories | Sensitive file exposure | Path validation, directory restrictions |
| Parameter Manipulation | Altering tool parameters to trigger unintended behavior | Data corruption, service misuse | Parameter validation, least privilege |
| Multi-Server Interference | One server manipulating others' behavior | Tool shadowing, response tampering | Namespacing, server isolation |
Essential MCP Security Best Practices
Securing your MCP implementation requires a comprehensive approach across multiple security domains. The following practices address the most critical security concerns for MCP applications, from authentication and encryption to input validation and monitoring.
Implementing these measures helps protect your MCP ecosystem against common threats while preserving its functionality:
Implementing Strong Authentication
Authentication serves as your first line of defense in MCP security. The MCP specification supports OAuth 2.1 for non-stdio transports, which provides a standardized way to authenticate clients and servers.
For HTTP-based MCP implementations, you should implement OAuth following the authorization framework in the specification. The authorization process should validate both the client's identity and its permissions to access specific MCP resources. Moreover, storing credentials securely prevents unauthorized access even if other parts of your system get compromised.
Here's how to implement a basic authentication middleware for an MCP server. This code sets up JWT-based authentication for HTTP MCP endpoints:
import express, { Request, Response, NextFunction } from "express";
import { Server as MCPServer } from "@modelcontextprotocol/sdk/server";
import jwt, { JwtPayload } from "jsonwebtoken";

// 1. Fail fast if the secret is missing
if (!process.env.JWT_SECRET) {
  throw new Error("Missing JWT_SECRET environment variable");
}
const JWT_SECRET = process.env.JWT_SECRET;

// 2. Augment Express’s Request type so `req.user` is known
declare module "express-serve-static-core" {
  interface Request {
    user?: string | JwtPayload;
  }
}

// 3. Define auth middleware with full types
const authMiddleware = (
  req: Request,
  res: Response,
  next: NextFunction
): void => {
  const authHeader = req.headers.authorization;
  if (!authHeader?.startsWith("Bearer ")) {
    res.status(401).json({ error: "Missing or malformed Authorization header" });
    return;
  }

  const token = authHeader.slice(7); // drop "Bearer "
  try {
    const decoded = jwt.verify(token, JWT_SECRET, {
      algorithms: ["HS256"],
    });
    req.user = decoded;
    next();
  } catch {
    res.status(403).json({ error: "Invalid or expired token" });
  }
};

const app = express();
app.use(express.json());

// 4. Apply auth to your API or MCP endpoint
app.use("/api", authMiddleware);

// 5. Mount the MCP server transport
const mcp = new MCPServer({
  // … your Server config …
});
app.use("/mcp", mcp.middleware());

// 6. Start listening
const PORT = Number(process.env.PORT) || 3000;
app.listen(PORT, () => {
  console.log(`HTTPS & SSE server running on port ${PORT}`);
});
After defining this middleware, you would apply it to all MCP routes in your Express application. The token verification ensures only authenticated clients can access your MCP server. You could enhance this further by checking user roles or permissions stored in the token.
Remember that your authentication model must align with the MCP transport type you're using. The stdio transport, primarily used for local process communication, relies on operating system security mechanisms rather than explicit protocol-level authentication.
Securing Communication Channels
Encryption protects data as it travels between MCP components. All remote MCP connections should use TLS 1.2 or higher to encrypt communications.
Certificate validation prevents man-in-the-middle attacks by ensuring that servers are what they claim to be. Your MCP clients should verify server certificates against trusted certificate authorities. Furthermore, certificate pinning adds another layer of protection by allowing clients to reject unexpected certificate changes that might indicate compromise.
Here's how to configure secure HTTPS for an MCP server. This code creates a secure HTTPS server with strong TLS settings:
import https, { ServerOptions } from "https";
import fs from "fs";
import express, { Express, Request, Response, NextFunction } from "express";
import { SSEServerTransport } from "@modelcontextprotocol/sdk/server/sse";

const app: Express = express();

// ——— Hook up SSE transport ———
// You’ll need to wire this up according to your SDK version.
// Here’s a placeholder example of mounting its handler at /events:
const sseTransport = new SSEServerTransport();
app.get("/events", (req: Request, res: Response, next: NextFunction) => {
  sseTransport.handler(req, res, next);
});

const httpsOptions: ServerOptions = {
  key: fs.readFileSync("./server-key.pem"),
  cert: fs.readFileSync("./server-cert.pem"),
  minVersion: "TLSv1.2",
  ciphers: [
    "TLS_AES_256_GCM_SHA384",
    "TLS_CHACHA20_POLY1305_SHA256"
  ].join(":"),        // Node expects a colon-delimited string
  honorCipherOrder: true
};

const server = https.createServer(httpsOptions, app);

const PORT = 443;
server.listen(PORT, () => {
  console.log(`HTTPS & SSE server running on port ${PORT}`);
});
This configuration enforces TLS 1.2 or higher, specifies strong cipher suites, and prioritizes them by security. You would then create your SSE transport and connect it to this server. For production use, ensure you obtain certificates from a trusted certificate authority rather than using self-signed certificates.
Validating Inputs and Sanitizing Outputs
Input validation forms a critical defense against many MCP attacks. Every parameter passed to your MCP tools must undergo strict validation before use. Validation checks should verify that inputs match expected formats, fall within acceptable ranges, and don't contain malicious patterns.
Let’s consider file access tools—one of the most common MCP implementations. Without proper validation, these tools might enable path traversal attacks, where malicious inputs like ../../../etc/passwd access files outside intended directories. Proper validation ensures file operations remain within authorized boundaries.
Here's an example demonstrating how you can implement secure path validation. The function below prevents directory traversal attacks by ensuring paths stay within authorized directories:
import path from 'path';
import fs from 'fs';

export function isValidAndSafePath(
  filePath: string,
  allowedDirectories: string[]
): boolean {
  let resolvedPath: string;
  try {
    // Turn into absolute path and resolve symlinks
    resolvedPath = fs.realpathSync(path.resolve(filePath));
  } catch {
    // Invalid path or broken symlink
    return false;
  }

  return allowedDirectories.some(dir => {
    let resolvedDir: string;
    try {
      resolvedDir = fs.realpathSync(path.resolve(dir));
    } catch {
      // Skip any bad allowedDirectory entry
      return false;
    }

    // Allow if exactly the directory or inside it
    return (
      resolvedPath === resolvedDir ||
      resolvedPath.startsWith(resolvedDir + path.sep)
    );
  });
}
This function ensures path safety by first converting the user-supplied filePath into a fully resolved, absolute path. Under the hood it uses path.resolve to clean up any . or .. segments and then fs.realpathSync to collapse any symlinks, so you end up with the true filesystem location. The same resolution process is applied to each directory in your allowedDirectories list.
Hence, a path is considered valid only if it exactly equals one of those allowed directories or if it lives strictly inside one (i.e., its resolved form begins with the allowed directory path plus the platform’s path separator). Any errors during resolution—such as a broken symlink or an invalid path—immediately cause the function to return false, preventing unintended access.
Output sanitization is equally important. When tool outputs feed back into the AI's context, they should be scrubbed of anything that resembles instructions or control sequences. This prevents multi-stage attacks where initial outputs compromise subsequent operations.
Implementing Least Privilege Access Control
The principle of least privilege states that every component should operate with minimal permissions needed to perform its function. For MCP, this means each server and tool should only access resources absolutely necessary for its operation.
MCP servers should run with restricted permissions at the operating system level. Container technologies like Docker help isolate MCP servers, limiting potential damage if compromise occurs.
Let’s look at a permission system for MCP tools. This code implements tool-level permission checks:
// Define a string‐literal type for permission levels
export type PermissionLevel = 'read' | 'write' | 'admin';

// Enum to hold the actual permission strings (optional, but often convenient)
export enum PermissionLevels {
  READ = 'read',
  WRITE = 'write',
  ADMIN = 'admin',
}

// Map your tools to the permissions they require
export const toolPermissions: Record<string, PermissionLevel> = {
  list_files: PermissionLevels.READ,
  read_file: PermissionLevels.READ,
  write_file: PermissionLevels.WRITE,
  delete_file: PermissionLevels.ADMIN,
};

// Assign numeric values to each level for easy comparison
const PERMISSION_VALUES: Record<PermissionLevel, number> = {
  [PermissionLevels.READ]: 1,
  [PermissionLevels.WRITE]: 2,
  [PermissionLevels.ADMIN]: 3,
};

/**
 * Check whether a user at `userLevel` has at least the `requiredLevel` permission.
 * Returns false if either level is invalid.
 */
export function hasPermission(
  userLevel: PermissionLevel,
  requiredLevel: PermissionLevel
): boolean {
  const userVal = PERMISSION_VALUES[userLevel];
  const reqVal = PERMISSION_VALUES[requiredLevel];

  // If either lookup fails, deny by default
  if (userVal == null || reqVal == null) {
    return false;
  }

  return userVal >= reqVal;
}
You would then use this system in your tool handlers to check if the current user has sufficient permissions before executing the requested operation. This fine-grained permission model ensures users can only access tools appropriate for their authorization level.
Monitoring MCP Activity
Comprehensive logging captures all MCP interactions for security analysis. Every tool invocation, resource access, and authentication attempt should produce detailed logs. These logs become essential for detecting attacks, diagnosing vulnerabilities, and conducting forensic analysis after security incidents.
Beyond basic logging, implement anomaly detection to identify unusual patterns in MCP usage. For example, a sudden increase in file access operations or attempts to invoke uncommon tools might indicate compromise.
Here's a logging implementation for MCP servers. This code sets up structured logging for MCP tool invocations:
import winston, { format, transports } from "winston";

// 1. Configure the Winston logger
const logger = winston.createLogger({
  level: "info",
  format: format.combine(
    format.timestamp(),
    format.json()
  ),
  defaultMeta: { service: "mcp-server" },
  transports: [
    new transports.File({ filename: "mcp-security.log" }),
    new transports.Console({ format: format.simple() })
  ],
  exceptionHandlers: [
    new transports.File({ filename: "exceptions.log" })
  ],
  rejectionHandlers: [
    new transports.File({ filename: "rejections.log" })
  ]
});

// 2. Define a typed interface for the invocation payload
interface ToolInvocationParams {
  toolName: string;
  userId: string;
  args: unknown;
  requestId: string;
}

// 3. Log a tool invocation with structured metadata
export function logToolInvocation({
  toolName,
  userId,
  args,
  requestId
}: ToolInvocationParams): void {
  logger.info("tool_invocation", {
    tool: toolName,
    userId,
    args,
    requestId
  });
}
This logging system creates structured, machine-readable logs that can be easily analyzed by security tools. You would call the logging functions at key points during tool execution—before execution, after successful completion, and when errors occur. These logs should then be forwarded to a central security monitoring system.
You can forward these logs to your existing security monitoring infrastructure. Security Information and Event Management (SIEM) systems can correlate MCP activity with other security events across your environment, providing comprehensive threat visibility.
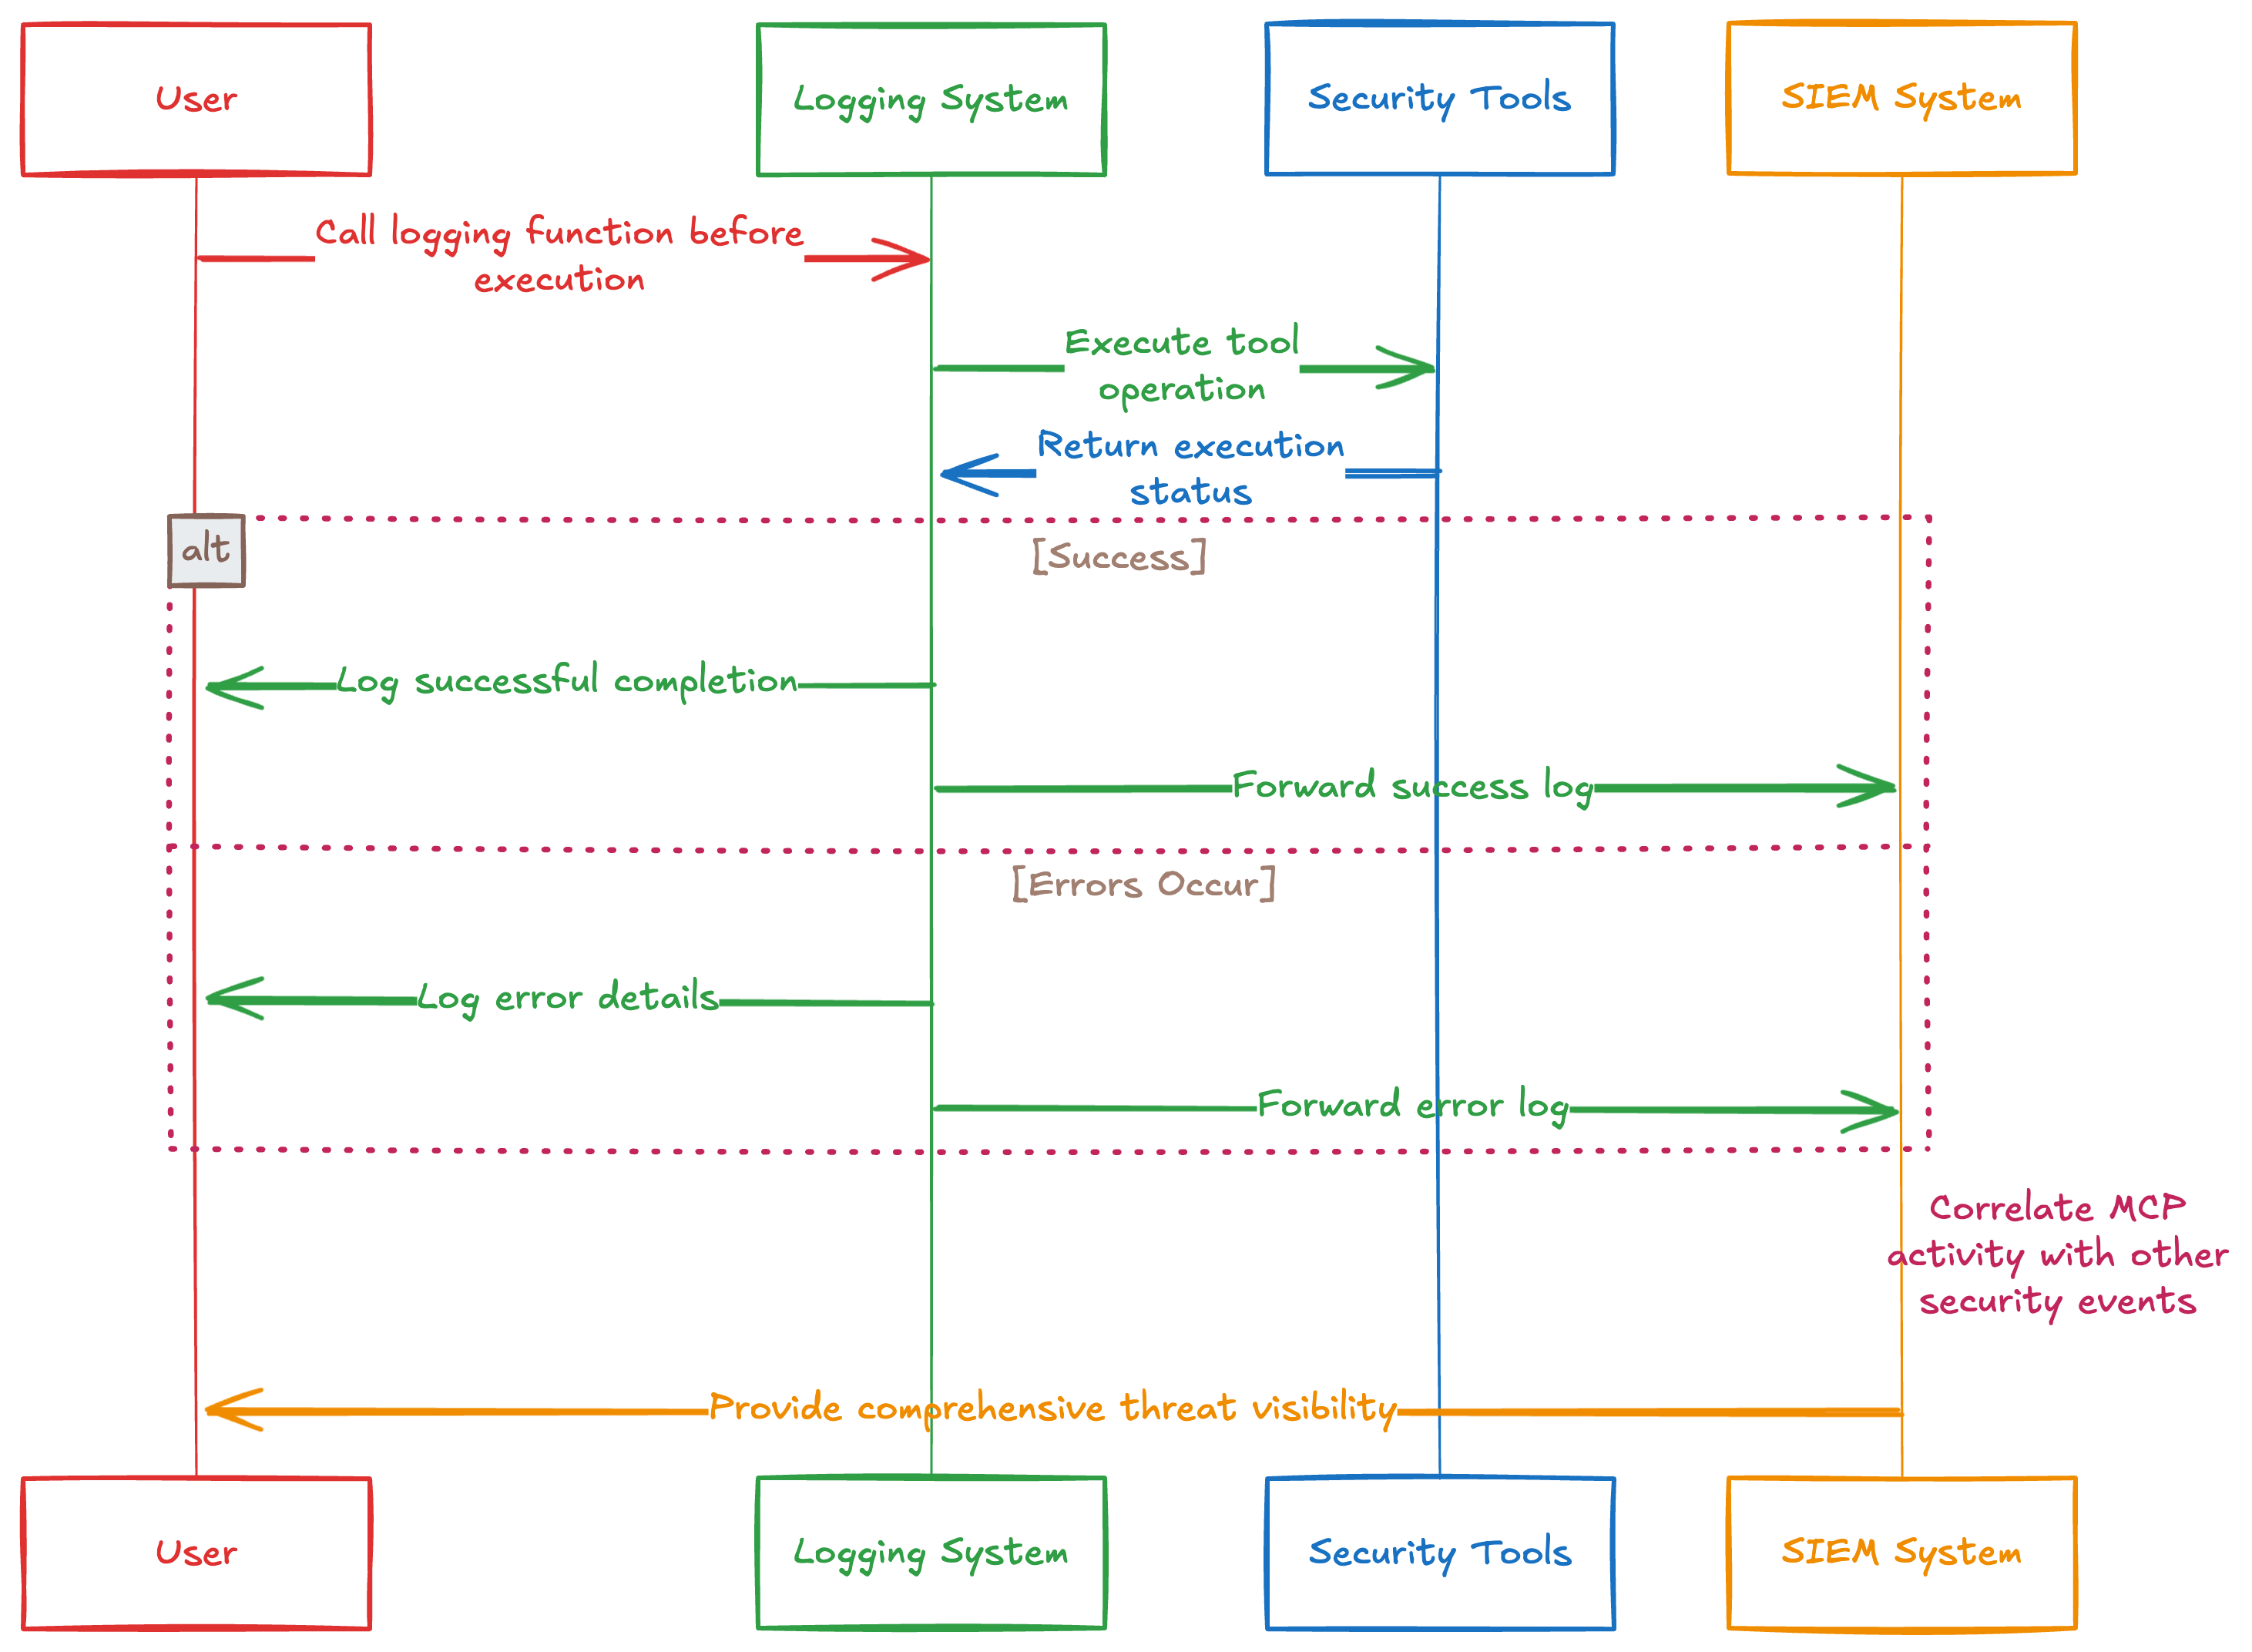 MCP tool calls logged and forwarded to security tools and SIEM for monitoring
Handling Multiple MCP Servers Safely
Many MCP environments involve multiple servers running simultaneously, each providing different tools and capabilities. This complexity introduces unique security challenges. A malicious MCP server might attempt to interfere with legitimate servers by shadowing tool names or manipulating responses.
Namespacing tools by server origin helps prevent collisions and confusion. Instead of allowing all servers to register tools in a single namespace, prefix tool names with server identifiers. This ensures tools remain properly isolated even when multiple servers offer similarly named capabilities.
Here's a system for managing multiple MCP servers securely:
import { Client } from "@modelcontextprotocol/sdk/server";
import type { Transport } from "@modelcontextprotocol/sdk/server";

// Information stored about each registered tool
interface ToolInfo {
  originalName: string;
  serverId: string;
}

// Options for creating a secure transport (e.g., TLS settings)
interface SecureOptions {
  [key: string]: unknown;
}

export class SecureMCPManager {
  private servers: Map<string, Client> = new Map();
  private tools: Map<string, ToolInfo> = new Map();

  /**
   * Creates a secure transport for connecting to an MCP server.
   * Replace with actual SDK transport implementation.
   */
  private createSecureTransport(
    serverPath: string,
    options?: SecureOptions
  ): Transport {
    // Replace with real transport creation (HTTPS, WebSocket, etc.)
    throw new Error("createSecureTransport not implemented");
  }

  /**
   * Adds a new MCP server under the given `id`, connects securely,
   * registers its tools, and tracks the client instance.
   * @throws if the server already exists or connection/listing fails
   */
  public async addServer(
    id: string,
    serverPath: string,
    options?: SecureOptions
  ): Promise<{ id: string; toolCount: number }> {
    if (this.servers.has(id)) {
      throw new Error(`Server with id "${id}" already exists`);
    }

    const transport = this.createSecureTransport(serverPath, options);
    const client = new Client({
      name: "secure-mcp-client",
      version: "1.0.0",
    });

    try {
      await client.connect(transport);

      const toolsResponse = await client.listTools();
      for (const tool of toolsResponse.tools) {
        const namespacedToolId = `${id}:${tool.name}`;
        this.tools.set(namespacedToolId, {
          originalName: tool.name,
          serverId: id,
        });
      }

      this.servers.set(id, client);
      return { id, toolCount: toolsResponse.tools.length };
    } catch (error) {
      // Clean up partial state on failure
      try {
        await client.disconnect();
      } catch {
        // ignore disconnect errors
      }
      throw new Error(
        `Failed to add server "${id}": ${
          error instanceof Error ? error.message : String(error)
        }`
      );
    }
  }
}
The SecureMCPManager class keeps its own Client instance for each server in a Map, and it namespaced each tool it learns about—storing both the original tool name and the server ID in a separate tools map. It guards against accidentally adding the same server twice and, on failure to connect or list tools, it tears down the partial client cleanly before bubbling the error up.
The stubbed-out createSecureTransport method is where you’d inject your TLS, WebSocket, or other transport logic, ensuring each connection is established under your chosen security settings.
Additionally, because you namespace tools by server ID, you inherently prevent one server’s tools from colliding with another’s; you could easily use that map to verify at invocation time that you’re calling the tool on the right server.
Implementing Human-in-the-Loop Controls
For sensitive operations, human confirmation provides an essential security layer. Even when an MCP server and client both allow an operation, requiring explicit user approval prevents many potential attacks. We recommend this approach for operations that modify data, access sensitive information, or trigger external actions.
Operation visualization shows users exactly what the AI plans to do before execution. Instead of silently performing actions, the system should display clear information about the tool being invoked, the parameters being used, and the potential impact. This transparency gives users the context needed to make informed decisions about allowing or blocking operations.
For example, this function wraps tool calls with human confirmation for sensitive operations:
import type { ToolCallResult } from "@modelcontextprotocol/sdk";

/**
 * Risk levels for tools.
 */
export enum RiskLevel {
  LOW = "low",
  MEDIUM = "medium",
  HIGH = "high",
}

/**
 * Options passed to the confirmation dialog.
 */
export interface ConfirmationOptions {
  title: string;
  message: string;
  details: string;
  riskLevel: RiskLevel;
}

// Helper declarations (provide implementations elsewhere)
declare function getToolRiskLevel(toolName: string): RiskLevel;
declare function requiresConfirmation(level: RiskLevel): boolean;
declare function showConfirmationDialog(
  options: ConfirmationOptions
): Promise<boolean>;

/** Timeout for user confirmation (ms) */
const CONFIRMATION_TIMEOUT_MS = 30_000;

/**
 * Cache of confirmed operations keyed by toolName and args signature.
 */
const confirmationCache = new Map<string, boolean>();

/**
 * Safely stringify arbitrary args, handling circular refs and truncating.
 */
function safeStringify(value: unknown, maxLen = 1000): string {
  const seen = new WeakSet<any>();
  let str: string;
  try {
    str = JSON.stringify(
      value,
      (_key, val) => {
        if (typeof val === "object" && val !== null) {
          if (seen.has(val)) return "[Circular]";
          seen.add(val);
        }
        return val;
      },
      2
    );
  } catch {
    str = String(value);
  }
  return str.length > maxLen ? str.slice(0, maxLen) + "…" : str;
}

/**
 * Wraps showConfirmationDialog with a timeout, auto-declining on timeout or error.
 */
async function confirmWithTimeout(
  options: ConfirmationOptions,
  timeoutMs: number = CONFIRMATION_TIMEOUT_MS
): Promise<boolean> {
  try {
    return await Promise.race([
      showConfirmationDialog(options),
      new Promise<boolean>(resolve => setTimeout(() => resolve(false), timeoutMs)),
    ]);
  } catch {
    return false;
  }
}

/**
 * Client interface supporting tool calls.
 */
export interface ToolClient {
  callTool(params: { name: string; arguments: unknown }): Promise<ToolCallResult>;
}

/**
 * Calls a tool on the client, asking user confirmation for risky operations,
 * with error handling, argument sanitization, and caching.
 */
export async function callToolWithConfirmation(
  client: ToolClient,
  toolName: string,
  args: unknown
): Promise<ToolCallResult> {
  // Determine risk
  const riskLevel = getToolRiskLevel(toolName);

  if (requiresConfirmation(riskLevel)) {
    // Unique key for caching based on tool and args
    const key = `${toolName}:${safeStringify(args)}`;
    if (!confirmationCache.has(key)) {
      const confirmed = await confirmWithTimeout({
        title: `Confirm ${toolName} Operation`,
        message: `The AI wants to use ${toolName}.`,
        details: `Arguments: ${safeStringify(args)}`,
        riskLevel,
      });

      if (!confirmed) {
        return {
          content: [
            { type: "text", text: "Operation cancelled by user" },
          ],
          isError: true,
        };
      }
      confirmationCache.set(key, true);
    }
  }

  // Execute tool call with error handling
  try {
    return await client.callTool({ name: toolName, arguments: args });
  } catch (err: any) {
    return {
      content: [
        { type: "text", text: `Tool failed: ${err?.message ?? String(err)}` },
      ],
      isError: true,
    };
  }
}
This function first determines a tool’s risk level. For medium or high-risk operations, it shows a user confirmation dialog—sanitizing and truncating the arguments—and caches approved decisions so you only ask once per unique call. If the dialog times out or the user declines, it aborts; otherwise it executes client.callTool inside a try/catch to return either the result or a structured error.
Conclusion
MCP security demands a multi-layered defense strategy combining authentication, encryption, validation, access controls, and human oversight. Start with the fundamentals, then add advanced protections like monitoring and least privilege constraints. Keep your MCP implementation current with the evolving specification to benefit from new security improvements and best practices.